The purpose of the campaign manager tool is to enable the administrator to create a campaign. It is possible to create several campaigns, each with different agents assigned, if desired.
Note: An administrator will only be able to create a campaign if this has been enabled on his “Permission” menu in TMS Users. Likewise, agent extensions will only be able to be assigned to a campaign if this feature has been enabled for them.
From the Campaign Manager tool, the administrator can create new campaigns by pressing the “Add Campaign” button on the top right of the page.
Campaign Types
There are different campaign types available to cater for varying business cases, these are beyond the scope of this manual, and will be covered under specialist topics. Each campaign type has its own attributes, and parameters.
Preview
Preview Dialer selects a contact for an available agent and then works through each number available within the contact until there are no more numbers to try, or a result has been reached. This approach means no leads are wasted, and every number is attempted that should be. When the contact has been chosen, the information pertaining to that contact is displayed to the agent, allowing them to familiarise themselves while a countdown begins. When the countdown runs out, the system will dial automatically on behalf of the agent.
Power Dial
Power Dial campaigns are more suited to scenarios of vast numbers of contacts, generally which came at little or no cost, so wasting leads is less of a consideration than agent idle time. When an agent is flagged as idle, the system selects multiple contacts, and then dials a single number from each of those contacts. The first person to answer is then passed to the agent. The rest of the contacts who answer may be configured to overflow to a set of actions such as a message or a queue of available agents.
Auto Dialer
Auto Dialer is a voice broadcasting dialer that runs calls independently from any extension. It calls on a concurrency scheme rather than a ratio because of independence. Its primary function is to call high volumes of leads very rapidly.
Adding a Campaign
To add a campaign, an administrator will complete the name, description and, optionally, a script.
Scripts
There are 2 Script Options:
Text Script
Interactive Script
Text is used to create a written script that needs to be followed to the letter. Parameters, or Place holders, can be added, for a personalised conversation. These placeholders will automatically be replaced by the relevant data that is uploaded with the list of contacts
An interactive script, allows the managers to add a scorecard ,on what must be covered during the conversation.This allows the agent free rein, on how to interact with the client, as long as all points are covered.
Campaign Parameters
Parameters available are dialer dependant.
Preview Campaign Parameters
Wrap-Up Time
The Wrap-up time parameter specifies how long an agent will have to disposition a call after hangup, i.e. provide an outcome for the call that has just happened.
Preparation Time
Preparation time is the amount of time, in seconds, that an agent will have to familiarise themselves with the next contact information. This will count down and, upon reaching zero, will dial. This countdown can be skipped by pressing the Dial button.
Max Call Attempts Per Number
The Maximum Call Attempts Per Number, indicates the amount of times a number will be tried, before it is deemed unreachable.
Minimum Contact Interval
A Minimum Contact Interval, will establish the shortest amount of time, before a contact may be retried.
CallerID
The number used to make the calls. This can be set as Anonymous, a randomised pool, a verified CLI pool, a personal caller ID, or a static number.

Randomised pools allow agents to call from a caller ID that is randomly selected, from a created pool. This gives the advantage of not being recognised by the contact, as the feature ensures different DIDs will show on the contacts phone. If using a Randomise pool, please remember, it will need to be created in advance.
A Verified CLI pool, is a confirmed pool of numbers. Depending on the package agreed to, the CLI pool will show the company name, or rotate the number in a specified timeline. Please speak to a euphoria representative, for more information on verified CLI pools
The personal caller ID is the number set as the CLI for an extension. The dialler will use whichever CLI is configured for the agent, as the outgoing CLI on all calls. If the campaign CLI is selected, it will override the individual id set on an extension.
Ring Time
Ring Time, indicates the maximum time the call will be allowed to ring, before considering it unanswered, and moving on to the next number.
Power-Dial Campaign Parameters
Some of the parameters are the same at the preview Dialers. The ones that are slightly different are.
Minimum Contact Interval
A contact can have multiple numbers. The minimum contact interval, will now indicate the minimum amount of time before a particular number of a contact is attempted again. For example if a number is dialled and the caller does not answer, or the call goes to voicemail, the agent may try a different number after the minimum contact interval.
Dial Ratio
The number of contacts that are selected for the dialer server to call at one time. Because the power dialer works down the list, only one number per contact will be selected. When answering machine detetion recognises that a number is not available , another contacts number will be added to the list of dialed numbers.
Answering Machine Detection
This button can be enabled to assist the dialer server, in detecting voicemail through Artificial Intelligence. When an answering machine is detected, the system will automatically select a disposition of unsure. Therefore, not occupying agent time with calls that have been answered by voicemail.
Overflow Hunt List
An Overflow Hunt List in Power Dialer, will redirect a second contacts calls, when more than one contact has answered. As a huntlist makes use of queues, this will activate additional queue analytics, which will be discussed further in the analytics lesson.
Trigger PD(Power Dialer) Call on
Trigger Power Dialer, will indicate when to dial the next set of contacts. If the power dialer is triggered on disposition, it means that the agent will be able to complete the disposition report, before the dialer selects the next set of contacts. If the power dialer is triggered on the hang up of a call, the next set of contacts will be dialed whilst the agent is filling in the disposition report.
Auto-Dial Campaign Parameters
The auto dialer parameters, are different from the preview and power dialers, as no agents are needed.
Overflow Hunt List
When a caller decides to hold after the announcement has played they will be sent to the huntlist. An example of this is when a caller hears a promotional announcement and is interested in the product or service. As the auto dialer does not make use of dispositions, the hunt lists analytics will be seen in the outbound queue.
Announcement to Play
Chosen from the list of available recordings in the system.
General Campaign Parameters
Custom Fields
Custom fields allow for non-standard information to be added to the script and appear on the agent’s screen when the contact is being dialled (or, in the case of Power-Dialer, on the phone).
Custom fields, are used to add additional information to the agent's view. This information is imported with
the contact list and needs to be in individual columns. When more than 5 custom fields are needed, it is
recommended to add a webhook, that links to the CRM with the client's details.
Dispositions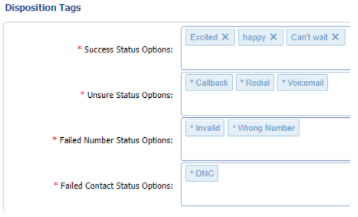
Dispositions are used to provide outcomes for each call, this is particularly useful in reporting progress and results of a campaign.
Campaign setup allows for different dispositions to be created for each campaign, and reported accordingly. There are some default tags in each category, and these are flagged with an asterisk (*) to identify them.
Dispositions are divided into categories, which will dictate how the system will act regarding that outcome. The categories are generally divided into Success, Unsure and Failure.
Success being that the desired outcome has been reached, and this contact should not be called again. Successful contacts are thus considered “completed”. Failure is subdivided further into two sub-categories, being Number Failure and Contact Failure; the first being that this particular number belonging to the contact has failed, and should not be tried again, but should the contact have other numbers, it will continue with those. Contact Failure is that the entire contact has become unviable and should not be called again, these contacts are also considered completed.
Unsure, means that there is no finite outcome, and this contact is still viable to be called again. The Max retries parameter interacts with this category as when the Max retry value is reached, the outcome is changed to a Failure state of “Unreachable”. This would be either a Number Failure or, should there be no further numbers to try, a Contact Failure.
There are certain system-generated and other mandatory dispositions in the platform, these are listed in the table below with their categorisations and a description of the disposition.
Agent Permissions
Update Contact Details
Allows the agent to modify or add to a contact's details, particularly useful in adding alternative numbers to a contact.
Add new customers
Enables agents to add contacts to the current list.
Add notes
Allows an agent to make notes either in the Agent Workspace whilst on the call or in the disposition window at the end of the call. These notes are stored with the call dispositions.
Set CRM Tag
This is also available in-call or in the disposition window and allows an agent to capture a reference number and associate it with the call. These tags are also helpful in searching for calls in Call Detail Records or Recordings pages.
Allow incoming calls during prep.
Will enable an agent to receive an inbound call during the preparation countdown; the countdown will then resume when that call is complete. If this is not enabled, calls will be automatically rejected.
Sticky Agents
Sticky Agents, allow contacts to be assigned to agents that have tried, or have made contact with the client.
Allow Early HangUp
Allow Early Hang Up, allows the agents to hang up on a call before the specified ring timeout.
Targets
It is possible to create targets for a campaign, namely, Total Calls, Completed Contacts, Successful Calls or Financial Target, and to choose whether achieving the desired target will automatically deactivate the campaign. Note that targets are also available at a list level.
Targets
It is possible to create targets for a campaign, namely Total Calls, Completed Contacts, Successful Calls or Financial Target, and to choose whether achieving the desired target will automatically deactivate the campaign. Note that targets are also available at a list level.
Campaign Manager Page
The Campaign Manager page allows for an overview of parameters, with buttons to Edit or Delete the campaign, and options to link to the statistics, add webhooks, assign agents and manage lists.

Add Dialer Trickle Feed
Dialer trickle Feed is An API call that allows a user to push contacts directly into a specific contact list of a campaign in order to be dialed by one of their agents as a priority. This can be done through any type of URL where lead generation is done, for example, Facebook. The lead will feed into the top of a campaign list automatically as a priority.
Dialer Trickle feed can be used with both a preview and power dialer, but is recommended for the preview dialer.
An example of this would be when a user adds their information to a Facebook page and specify their language. The lead will then be added to the list with that language specification in the campaign. To set up this API key for the dialer trickle feed, please refer to the API Documentation on the Support Portal.
Add a Webhook
Webhooks are a mechanism to allow the platform to interact with other systems. These can be added to campaigns to allow feedback or start of a workflow in a secondary system to the TMS such as a CRM platform. Webhooks must already exist in order to be selected within campaigns, these are created in the Integration Centre.
The action of the webhook can be seen in the Agent Workspace, and will be covered in the corresponding chapter.
When a webhook is added, 3 settings are available:
Which webhook
When to Fire, i.e. what event will
initiate the webhook
Behaviour, i.e. whether to ask or
just to do it.
Stats
Here an administrator will find all information including how many calls were completed, how many failed and why. These stats are linked to the administrators Campaign Analytics tab and will be discussed further in the Analytics chapter.
Assign Agents
Assigning an agent to a campaign means that when they are logged in, the campaign is active and there are available contacts in an active list, the agent will receive calls from that campaign. Agents assigned at a campaign level will be default agents on all lists of this campaign. Note that extensions will not be available for selection if they have not been enabled as an agent.
In order for an extension to be activated as an agent, the administrator needs to enable the agent on the Agent tab, in the extension manager menu as well as assigning the agent to an outbound queue.
To assign the agents to a campaign, click on the “Manage” button of the desired campaign in the Campaign Manager page. This will open a new “Manage Campaign” page with the agents and contact lists as well as Stats, Webhooks, Edit and Delete buttons. Select the “Edit” button within the Agents section.
A pop-up window will appear, with 2 panes. Agents on the left hand side, arranged according to groups, and groups in the right hand pane. Should a group be selected, all members of that group will be included. Note: Multi campaign membership is possible with Preview Dial but not Power Dial campaigns. Should an agent be part of a Power-Dial campaign, and are assigned to another campaign, they will be unassigned from the Power-Dial campaign.
Campaign Lists
Once a campaign is set up and agents assigned, a contact list should be uploaded to complete the necessary to start a campaign.
List
Lists available for a campaign are visible on the bottom of the Manage Campaign page. To add a list, click on the “Add List” button, a pop-up window will appear.
Lists may have their own properties, which will take precedence over those in the campaign.
Name
Inherit target from campaign
Target - type and value, should inheritance be disabled.(When a target is set on a list level this will over rule the campaign target for that list of contacts)
Auto deactivate when reaching target
Custom script(When a script is created on list level, this will over rule the campaign script)
Upload a CSV spreadsheet by selecting the upload area to browse your local machine or drag a file onto the window. Once the list is imported, the categories need to be checked to ensure that all information matches the configured field setting, i.e. first name is in the First Name field. Note that a contact in a list can only be deleted if they have not been dialled before.
Within each campaign list, an administrator will be able to view the most recent campaign history and the details of each call. All the contacts dial statuses with a time, number of attempts and the agent that last called them. More details of the disposition are available in a tooltip when clicking on a contact name, whilst further contact history details can be found by selecting the “Detail” button.
Note: The number shown next to the contact name is the last contacted number.
List Agents
Once a list has been created, agents can be assigned to the list. Agents already assigned to the campaign will already be selected
Lists can be moved in order of priority by dragging the list up or down. The list at the top will be contacted first.
Campaign Main Page
The Campaign main page presents an overview of all campaigns, their activity and their progress.
The list of campaigns is in order of priority from top to bottom. The campaigns can be rearranged, by dragging or using arrows. When an agent is allocated to more than one campaign, they will receive leads from the higher priority campaign first until that campaign is completed or until the leads in that campaign are exhausted.
The status of a campaign is indicated by either a Red Circle (Not in action), Green Circle (Campaign in use) or Blue Tick (Campaign completed). Selecting the progress bar will show a tooltip with the progress percentage as well as the outstanding target.
How to Adjust Dispositions for a Campaign.
How to Create a Script to the Campaign.
How to Add Agents to the Campaign.
How to Assign a List to a Campaign.
If Agents are Added to a Campaign, are the Same Agents Added to a List on Creation?